

|
|
It's the beauty of glaciers that bring us there--but we need
strategies for doing so safely.
(Mt. Rainier)
|
Glacier Travel and Crevasse Terrain
Glaciers are a magical part of the alpine landscape—their massive icy hulks, laid down over the eons, are reminders of power of persistence and their diminishing modern state serves as a reminder of our precarious position as stewards of the Earth. Traveling over glaciers, experiencing the crevassing, tumbling, tumultuous, patterns is to experience the passage of time directly. But it is precisely because of this crevassing, tumbling, and tumult that your glacier travels skills need to be sharp before integrating glaciers into your alpine climbing quiver.
Through my personal and professional climbing on glaciers ranging from Alaska to the Alps to Peru, I've had the opportunity to learn a spectrum of glacier travel techniques—and I've experienced the alarm of watching glacier travel techniques either inappropriately or ineffectively applied. Here, I'll lay out for you some basic glacier travel strategies and techniques to make your time in these mystical alpine places safer, more efficient—and, hence, more enjoyable.
Strategy#1: Rope Intervals
Rope interval distance—the distance between each person on the rope team—is the first part of the glacier puzzle that you've got to figure out. Based on what I've seen, some people seem to think that just because you brought a 60m rope, you've got to use the whole thing. Use what you need. Determining the appropriate distance between each person is a function of two intertwining factors:
-
The glacial geography
-
The size of your rope team.
Glaciers in the North Cascades are smaller than glaciers in Peru, which are smaller than glaciers in Alaska. Generally speaking, the smaller the glaciers, the smaller the potential crevassing—and the smaller the potential crevassing, the shorter the necessary interval distance between each rope team member. But then the size of your team also comes into play. If you're traveling as a team of two, you'll need a greater distance between team members than traveling as a party of four, since a larger team will span a larger distance and will leave a more massive “meat anchor” on the surface of the glacier than you do with a team of two.
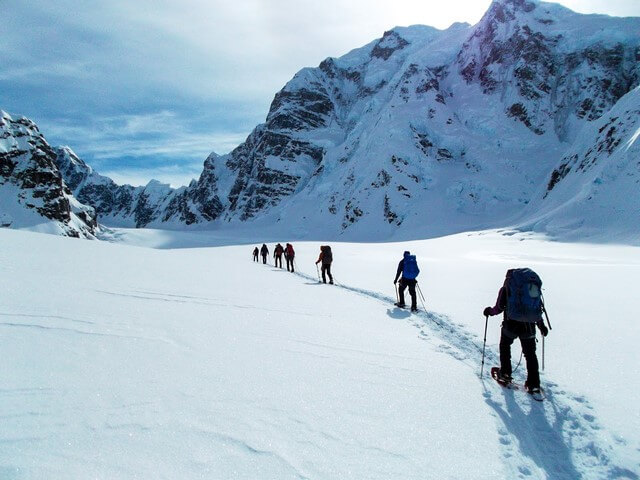
|
| Long intervals are the order of the day on Alaska's Kahiltna Glacier (Denali National Park). |
Two final points about intervals, team sizes, and strategies for roping up:
-
Once you determine an appropriate interval for traveling in the particular crevasse terrain, keep it! Climbing Rainier in the summer, I'll constantly see people with 50' of rope between them, but they're walking 20' apart, with massive coils in their hands or a huge dangle-tangle of rope in between them. These people might a well just take off the rope, as they're set up for a base-jump quality crevasse free fall anyway.
-
You may have seen that parties of two often tie “alpine butterfly” knots in between them. The theory is that since there is only one person on the surface to catch the fall, these knots can catch on the lip of the crevasse and help—and it actually works pretty well. The problem is that most people train for crevasse rescue using a 3:1 mechanical advantage system that won't work if you've got knots in the rope strand that you're trying to pull in. I know this, because it happened to a group I was with in Chamonix years ago! We'd heard about knotting the rope between team members and decided to do it—then one team had a crevasse fall while descending from the Midi-Plan Traverse. Suddenly, we had to improvise a “Drop C” rescue system on the fly. Don't let it happen to you!If you opt to put knots in the rope make sure you're familiar with both “Surface C” and “Drop C” crevasse rescue strategies.

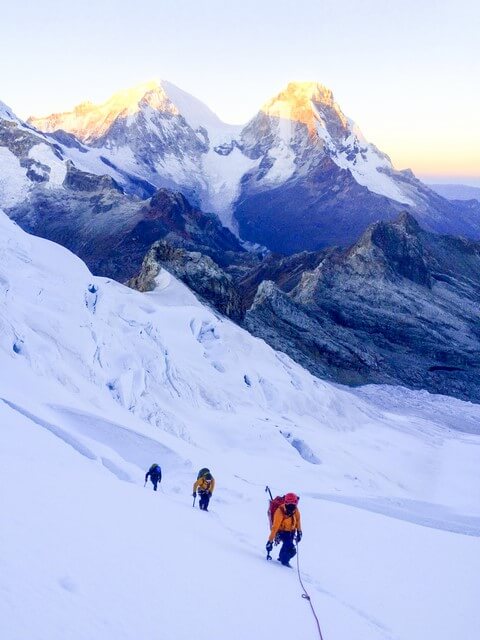
Two-person rope teams may choose to put "stopper" knots in between
(Yanapaccha, Peru).
Strategy
#2: Matching the Rope Strategy to the Terrain and to the Team
If you're on
an active glacier with crevassing, and concerned about falling into crevasses
(into the mountain) then keeping long interval, but if you've transitioned onto
a crevasse-free part of the mountain (rock ridges, snow slopes, etc), then
consider changing your strategy. If you
are climbing in steep terrain where you couldn't likely catch a slip from
another member of your team, then you should use intermediary protections
(pickets, screws, etc). If intermediary
protection is impossible, it is safer to unrope, since the rope only multiplies
the chances of being pulled off—or to consider turning around and climbing a
different objective.
If the
terrain is such that the team feels confident it can stop the fall of an
individual member, the rope should be shortened to lessen the length of any
potential fall (check out my May 2016 article on “Smoother Alpine Transitions”
in the print copy of Climbing Magazine for more info about techniques for doing
so—or find the link when it's released online soon)--however, you would be wise
to test how able your are to actually stop these kind of slips, as it is much
harder than most people think.
Shortening the rope is also important to consider in terms of the rock
fall longer intervals can cause. A prime
example of where this technique should be used is Mt. Rainier's popular
Disappointment Cleaver route: A “cleaver” is a rock ridge separating two
glaciers. The route leaves one glacier,
goes up the loose, rocky cleaver for 1000', and gains another glacier. Parties that go up this with glacier-sized
intervals will drop monumental amounts of rock onto parties below.
A final
scenario is one where there is no danger of slipping and it is simply necessary
to travel over rocky terrain for a short period. An example of this would be traveling down
Mt. Baker's Pumice Ridge later in the season.
In this case, the quickest solution would be to make some neat, small
coils between team-members and simply carry these in your hand, “walking the
rope” until again gaining the glacier.
Using
critical evaluation of the terrain and the hazards and determing the
appropriate rope strategy is essential to safe and efficient mountain travel;
in yet—as the psychologist Abraham Maslow once pointed out--”If your only tool
is a hammer the whole world looks like a nail.”
Smart alpinists will expand their rope strategy toolkit.
Strategy#3: Considering the Accoutrements—Pre-rig/Chest Harness/Leashes
If you fall into a crevasse you will need to either have your team haul you out or you will need to quickly ascend out while they anchor you. The second solution is often the quicker and more preferred option. For this reason, many people decide to “pre-rig” by pre-placing both hand and foot prussiks on the rope, such that if they were to fall into a crevasse, they can immediately begin ascending out. This is a nice idea, but there are several holes in it:
-
Sure, if you're on either end of the rope, you know which way you'll need to ascend, but if you're in the middle, you could potentially need to ascend in either direction. So now you need both a waist and a foot prussik ascender in both directions. That only compounds the following problems...
-
Typically, the idea is that you tuck the prussiks into your pockets, but inevitably they fall out, creating tripping hazards that overshadow any quick ascension benefits they may provide.
-
All this tat hanging off of you creates tangles everytime you roll into a “safe zone” break and have to take off your pack or unclip to pee, etc. etc.
-
As noted in Strategy #2, you should be adjusting your rope length to account for the hazards at hand. Having prussiks on the rope makes this cumbersome-to-impossible. So then you just default to keeping intervals long—and creating numerous other hazards along the way.
The solution is to rack your harness with some prussiks at the ready and practice so that you can put them on quickly, in the dark, in the cold, with gloves on.
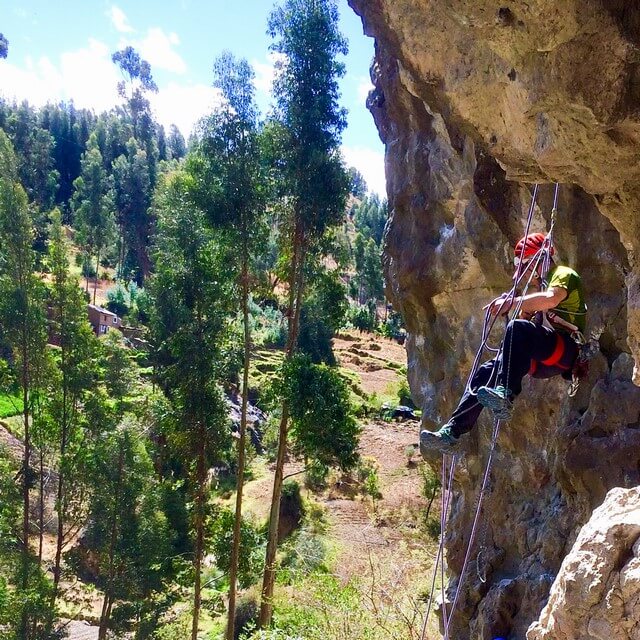
|
| Practicing rope ascension before its needed (Los Olivos, Peru). |
-
Once again, while the end people on the rope know which way the chest pull will come from, it could come from either direction for middle people. Rigging up dual chest harnesses and dual prussiks is a recipe for a Gordian Knot.
-
In the event that you are the person on the surface responsible for stopping the fall of a partner in the crevasse, the chest harness now raises the pull of the rope from your harness to way up on your chest. Try catching a crevasse fall like that—and ask any climbing partners that insist on chest harnesses to do so as well.
An unconscious partner will almost certainly require a chest harness, so make sure you've practiced rappeling into crevasses to attach one and ascending out.
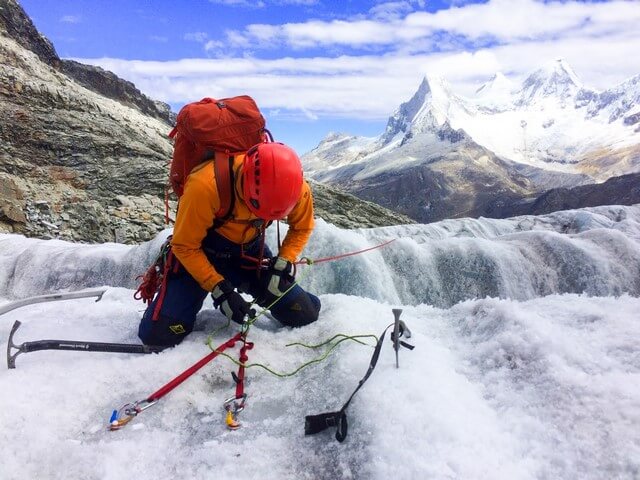
|
| Whatever rope strategies you choose, make sure to practice the appropriate rescue skills in advance (Cordillera Blanca, Peru). |
Keep you glacier travel from proceeding at a glacial pace. Before stepping onto the glacier, ask yourself:
-
What rope interval is appropriate to the given glacier and team size?
-
What is the primary hazard—falling off of the mountain or into the mountain?
-
Do the drawbacks of the various crevasse pre-rigging plans outweigh the benefits?
Climbing is not cooking. Rocky ridgelines, sprawling ice sheets, and snowy expanses don't present easy recipes. Climbing is about creativity—seeing the situation in front of you and responding accordingly. Applying the right technique to the right terrain will make your alpine climbing more safe and more successful. It will also make your climbing more satisfying. And—after all--ultimately that is why we climb.
(End note: The North Ridge of Mt. Baker in the North Cascades is a prime example of a heavily glaciated alpine route demanding a variety of rope techniques. Check out this Mammut Athlete Team Blog link for a look at the equipment I bring on this type of route.)

|
| (Urus Este, Peru) |
No comments:
Post a Comment